How to set up a contact form and connect it to your email?
How does a contact form work and look like?
How to set up a contact form and connect it to your email?
Contact form - Widget Settings
Are you looking for a way to make it easier for visitors to get in touch with you through your website?
Adding a contact form is a simple solution that can save you time and streamline communication with potential clients or customers. In this tutorial, you'll learn step-by-step how to create a custom contact form for your website, allowing you to stay organized and respond to inquiries more efficiently.
Don't miss out on the opportunity to enhance your website's functionality - read on and learn how to create your own contact form today!
How does a contact form work and look like?
You have probably already seen contact forms on many websites. They allow you to contact the company/owner of the site. Contact forms find their use in many business areas, including lead generation, marketing or customer service.
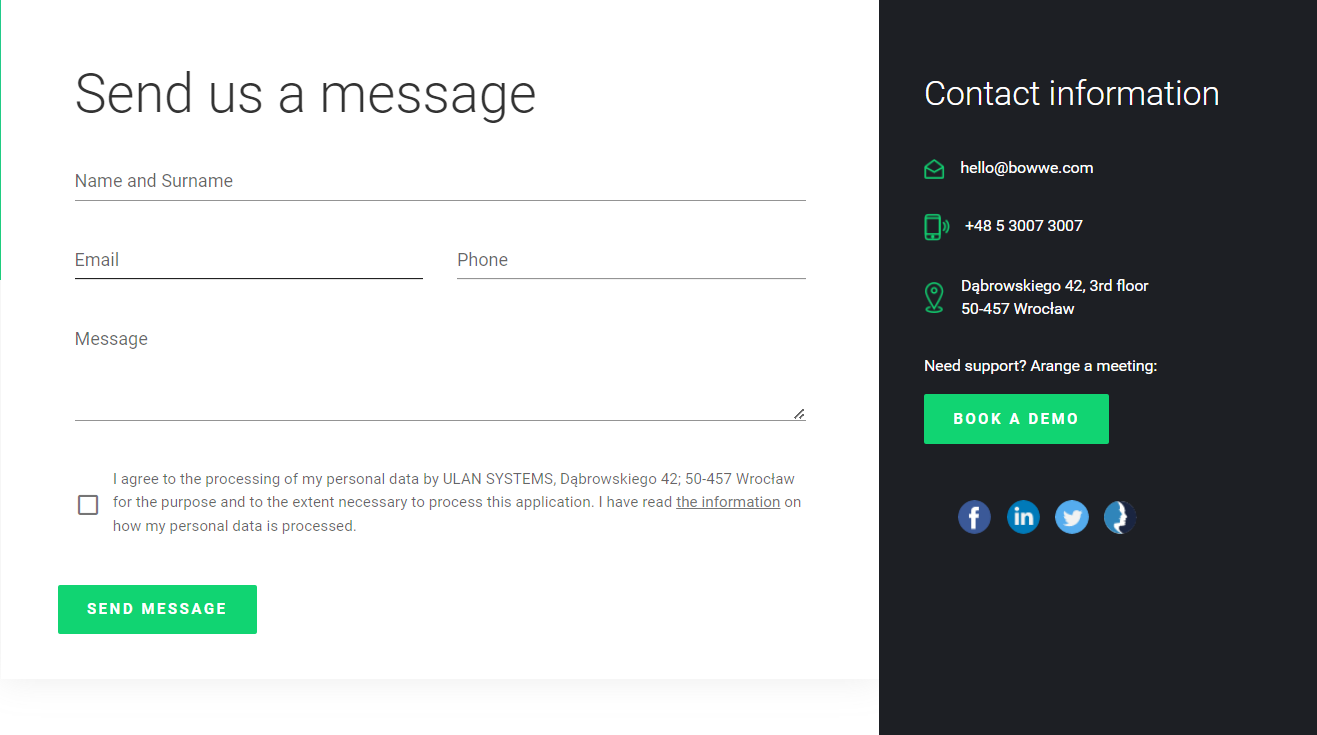
In contact form, the user most often provides his name, email address (necessary to get an answer to his question) and the subject on which he/she is contacting. At the end there is usually a field to enter message text.
This is, of course, the most standard example of a contact form. What kind of form you put on your site is up to you. BOWWE offers tremendous customization options for contact forms. So how to add one to your website? Find out below:
How to set up a contact form and connect it to your email?
You can create a contact form from scratch or choose one of the ready-made layouts. All you need to do in them is to customize the images, colors and complete the contact information and you will be able to use them on your site!
To enter the Widget Settings click on the Contact form and select the green button that appears above the widget.
Contact form - Widget Settings
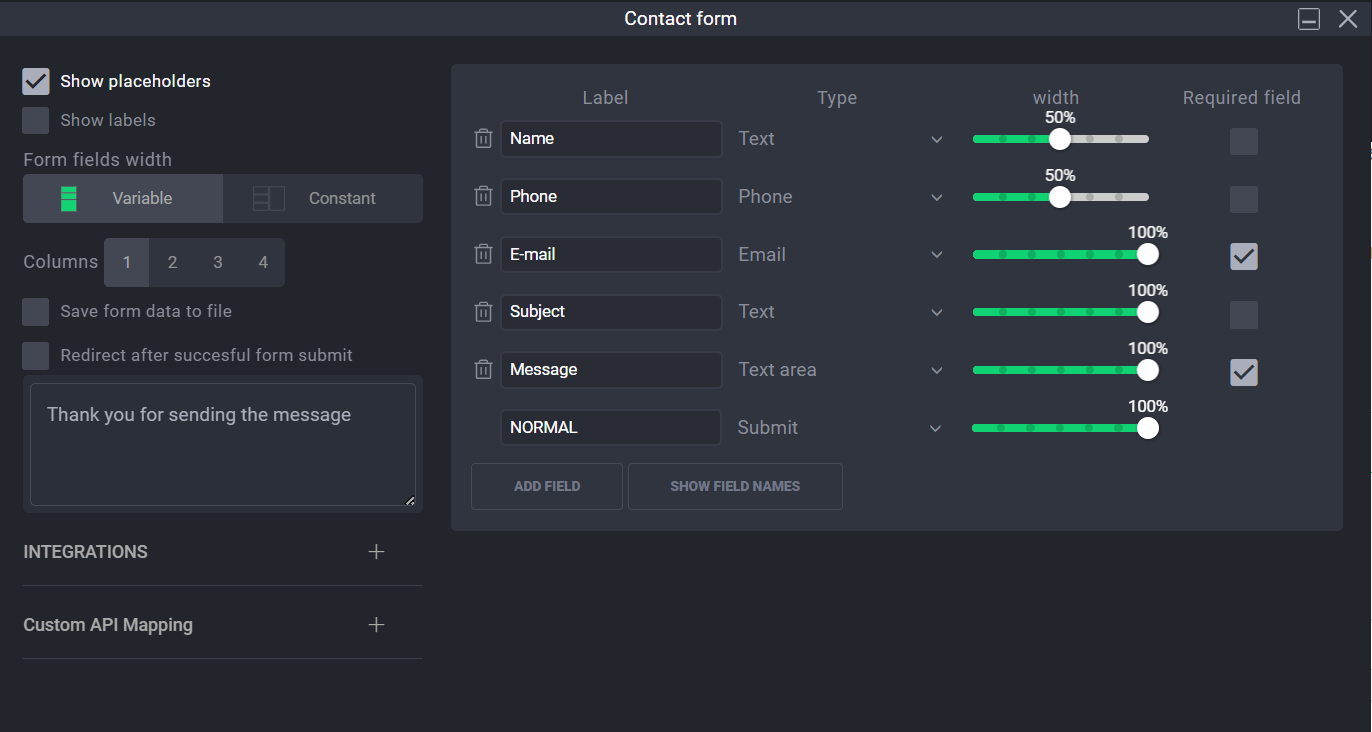
Contact form fields
On the right side of the Settings panel you can see the current boxes of your form, which you can edit, delete or add new ones.
- In the Label column, you can type the name for the field displayed to your site visitors.
- The Type column is responsible for the type of data that will be possible to enter in certain fields (e.g., the Phone Number type accepts only numbers, while the Email type will not allow you to send the form to the user if they enter an incorrect email address).
- The Width column allows you to change the width of the given fields (you can choose between 100%, 75%, 66%, 50%, 33% and 25%)
- Required field defines whether the field must be filled in for the form to be submitted (mostly used for email addresses).
- Click the ADD FIELD button to add a new field for editing.
- Click the SHOW FIELD NAMES button to see how the field is named in the code. (This is an option for developers and professionals.)
- You can delete unneeded fields by clicking the trash can icon.
- The Show placeholder and Show labels options are responsible for describing the Contact form’s field to your visitors. You can select if you want to put the label inside or outside the field, on the left side or from the top. You can even select two options at the same time. Both labels have the same description but may have different styles depending on how you edit them in the BOWWE Builder.
- Form fields width can be either Variable, which activates the ability to edit the width of the given fields on the right, or Constant - which sets the fields automatically
- Columns is responsible for automatically dividing the fields into the selected number of columns 1-4
- Option Save form data to file additionally attaches all data attached by the filler to the file along with the message to the recipient. The file name must not contain spaces or characters other than in the English alphabet.
- Option Redirect after successful form submission redirects the user to the page you specified after successful form submission. So you can for example: redirect the user to a “Thank you” page.
In the field below you should type text, which will be displayed to the user, after successful form submission. Most often, a “Thank you” is placed in this field.
Integrations
- In the INTEGRATIONS section, select where you want the content of the completed form to be sent. Once you select one of the options, a pop-up will appear where you can enter your email address and the title of the email (by default, this is populated with the email configured with your account, and if you are using the BOWWE template then you will find a placeholder to replace it).
- The Custom API Mapping option is dedicated for professionals and allows to integrate the form with the functionalities of your system after you enter the appropriate code.
- Google reCaptcha v3 integration allows you to configure your contact form with a Google service that protects your website from spam. It uses advanced risk analysis techniques to tell humans and bots apart.